How do I upload to esp8266
By Olivia House
Diconnect power to the ESP.Bring GPIO0 to ground (press AND HOLD DOWN the pushbutton).Power up the ESP.Release the pushbutton.Click the round right arrow icon to upload the program.
How do I upload files to ESP8266?
- Create an Arduino sketch and save it. …
- Then, open the sketch folder. …
- Inside that folder, create a new folder called data.
- Inside the data folder is where you should put the files you want to be saved into the ESP8266 filesystem.
How do I upload codes to NodeMCU ESP8266?
Step 1: Open the example blink program from the “example for NodeMCU 1.0” section inside the example menu, Step 2: Connect the NodeMCU with your computer using the micro USB cable. Step 3: Select and Board and Port and upload the program, that’s it, now the builtin LED should start blinking.
How do I send data to ESP8266 from a website?
- Example: A client (browser) submits an HTTP request to the server; then the server returns a response to the client. …
- Enter your mySQL usename and password in code.
- install.php.
- postdemo.php file.
- view.php File.
How do I upload to ESP 01?
- 1.go to preferencespaste this link there …
- 2.then go to tools-boards-board managerthen install esp8266now go-to tools- boards. …
- now go-to tools- boards select generic esp8266 board. …
- Step 4: Circuit Diagram.
How do I upload an HTML file to NodeMCU?
- Go to Sketch > Show Sketch folder, and create a folder called data. Save the HTML and CSS files inside that folder;
- In Tools > Board, select the ESP8266 board you’re using;
- Then, go to Tools > Flash size and select 4M (1M SPIFFS).
How do I upload a spiff?
Uploading files to SPIFFS To select the right files to upload, you have to place them in a folder called data, inside the sketch folder of your project: Open your sketch in the Arduino IDE, and hit CTRL+K. Wait for a file explorer window to open, and create a new folder named data. Copy your files over to this folder.
How do I transfer data from firebase to NodeMCU?
- Step 1 : Download Arduino IDE. …
- Step 2 : Install ESP8266 Board to Arduino IDE. …
- Step 3 : Adding the Firebase library. …
- Step 4 : Adding the ArduinoJson library. …
- Step 5 : Setup Firebase realtime database. …
- Step 6 : Code explanation. …
- Step 7 : Connections for uploading code. …
- Step 8 : upload the code.
How ESP8266 get data from server?
- Creating Express Server: At first we need to create package.json file for the Express poject, so open the command prompt and upon going to the desired folder path, run the command.
- Creating Angular Code for Front End: …
- ESP8266 Code:
- void setup() {
- // Open serial communications and wait for port to open:
- Serial. begin(115200);
- while (!Serial) {
- ; // wait for serial port to connect. Needed for native USB port only.
- void loop() { // run over and over.
- if (Serial.available()) {
- Serial.
Is NodeMCU better than Arduino?
In common the NODEMCU is based on the ESP8266 microprocessor have a very low current consumption between 15 µA and 400 mA which can be further decreased with the deep sleep mode activated to 0.5 µA. The current consumption is then a factor 70000 higher in deep sleep mode for the Arduino Uno with 35 mA.
How do I connect my phone to NodeMCU?
To select the board, go to Tools > Board > Select the board. Additionally, to communicate with the NodeMCU, we’ll also need to select the port com. Go to Tools -> Port and select the appropriate PORT for your device. To keep everything running fast and smooth, let’s make sure the upload speed is optimized to 115200.
How do I connect my NodeMCU to WIFI?
- Step 1: Download the Arduino IDE and ESP8266 NodeMCU Driver. …
- Step 2: Configure ESP8266 NodeMCU As an Arduino. …
- Step 3: Run Blinking LED Program. …
- Step 4: Connect to a WIFI Network. …
- Step 5: See Next Instructable. …
- 8 People Made This Project! …
- 13 Comments.
How do I connect to ESP8266?
To see if it works, open the Wi-Fi settings on your computer, look for a network called “ESP8266 Access Point”, enter the password “thereisnospoon”, and connect to it. Then open a terminal, and ping to 192.168. 4.1 (this is the default IP address of our ESP AP). You’ll see that the ESP responds to your pings.
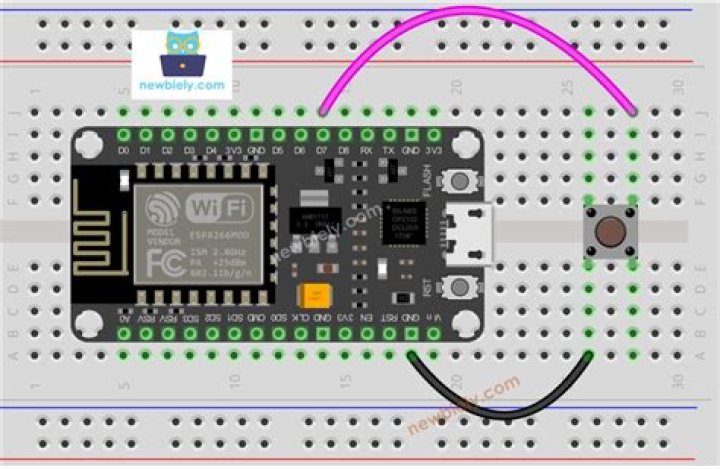
How do you program a ESP8266 module?
- Connect the USB-UART adapter to ESP8266 as follows: VCC -> VCC, GND -> GND, RX -> TX and TX -> RX.
- Pull the GPIO0 pin to GND.
- Connect the adapter to the computer.
- Run a program for flashing via UART, e.g. ESPEasy.
- Select the appropriate COM port and binary file you want to upload.
How do I use Arduino with ESP8266?
- Connect your ESP8266-01 Module to PC.
- Open your Arduino IDE.
- Go to File -> Preferences.
- Add this link to Additional Board Manager.
- Go to Tools -> Board Manager.
- Find ESP8266 board set and activate it.
What is a spiff file?
SPIFFS is a file system intended for SPI NOR flash devices on embedded targets. It supports wear levelling, file system consistency checks, and more.
What does Spif stand for?
A SPIF, or sales performance incentive fund, is a short-term sales incentive used to improve results over a short period of time.
What are spiffs ESP8266?
SPIFFS or Serial Peripheral Interface Flash File System is a system that utilizes extra flash memory on the ESP8266 and ESP32 for storing files. It’s so named because the user reads, writes or deletes files in the memory using the serial interface.
How do you make a website for ESP8266?
Upload your own HTML code as web page send(200, “text/plain”, “hello from esp8266!”); First we take webpage code in separate header file name it as “index. h”, our web page is now a array of characters stored in variable MAIN_page. Do not use comments in this file.
How do I control NodeMCU from my website?
- What You Need to Control I/O with NodeMCU.
- Create a Web Page using RemoteMe.
- Configure the Arduino IDE.
- Upload Code to your NodeMCU.
- Wire your ESP8266 for Web Control.
- Test the ESP8266 Web Control. Support Content Like This. You May Also Like.
How do I control esp32 from anywhere through the Internet?
- SQL query to create your table: Outputs_and_Boards_Table.sql.
- Insert and access database: esp-database.php.
- Handle HTTP requests: esp-outputs-action.php.
- CSS file to style your web page: esp-style.css.
- Display your control buttons: esp-outputs.php.
Does ESP8266 support HTTP?
Finally, you’ll learn how to make an HTTP POST request with an ESP8266. With this example, your ESP8266 can make HTTP POST requests using three different types of body requests: URL encoded, JSON object or plain text. These are the most common methods and should integrate with most APIs or web services.
How do I connect my Arduino to my website?
- Configure the Arduino as a Web Server. …
- Connect to the Arduino Web Server using Router Port Forwarding. …
- Handle Dynamic DNS using an External Service. …
- Log In to the Router. …
- Configure and Enable Port Forwarding. …
- Test that the Arduino can be Reached on the Internet. …
- Signing up With no-ip.
How do you use http begin?
begin( “ ); Then, we send the request by calling the GET method on the http object. This method will return the status of the operation, which is important to store for error handling. If the value is greater than 0, then it is a standard HTTP code.
How do I send data from ESP8266 to cloud?
- We will connect the ESP8266 to a local Wi-Fi network that has an active Internet connection.
- Once the connection is successful, we will send a GET request to the cloud server and then display the reply that the server sends back to the ESP8266 board: …
- Enter the SSID and password :
How do I get string from Firebase to NodeMCU?
- Introduction: How to Fetch Data From a Firebase Database on NodeMCU. …
- Tip Question Comment.
- Step 2: Create a New Database on Firebase. …
- Step 3: Add Host Name/Database Secret Key to Arduino Sketch. …
- Step 4: Connect Your NodeMCU to a WiFi. …
- Step 5: Complete the Arduino Sketch.
How do I connect to Firebase and NodeMCU?
Connect your NodeMCU ESP8266 with your personal computer via standard USB cable and upload code in it. While uploading the code into NodeMCU, the device continuously blinks. Now open the serial monitor form Tools, you will find data are uploaded to Firebase database.
How do I transfer data from NodeMCU to cloud?
- Step 2: Sign Up for AskSensors. First, Create a new account at AskSensors. …
- Step 3: Write the Code. Example sketch and ESP8266 WIFI libraries are available in github. …
- Step 5: DONE! That’s it!
How do I transfer data from Arduino to blynk using NodeMCU?
- What we need. We need : …
- Upload firmware first. For uploading firmware you can use this link How to add firmware.
- Add esp library in Arduino IDE. …
- ESP Hardware connection. …
- Arduino code. …
- Change software serial. …
- Wi-Fi configuration. …
- Make new project.
How connect ESP8266 NodeMCU to Arduino?
- step1. Choose Preferences in the File menu and enter the copied code in Additional Board Manager URLs part.
- Step2. Search the word ESP8266 in Boards>boards manager from Tools menu. Then install ESP8266 boards.